Tutorial: How to Restore A/V Sync to Variable Frame Rate Video for Editing in Premiere Pro
One of the most commonly reported issues Adobe Premiere Pro editors experience when working with footage captured using iPhones, screencam tools, Wirecast, and Skype is a loss of A/V sync on clips that played fine outside Premiere Pro. Here is a simple fix using a freeware tool called HandBrake that will re-sync your audio so you're ready to edit.
Page 1
Have you ever shot video with your iPhone or with your iPad, or created video with Camtasia, and found that it looks and sounds great when you play it in VLC Player or in QuickTime, then you bring it into Adobe Premiere Pro and all of a sudden it totally loses audio/video sync? In this tutorial, we’ll tell you why that happens and more importantly, we’ll show you how to fix it.
The reason this happens is a problem with Premiere Pro--specifically with handling variable frame-rate video. In projects that I've done, I've seen this issue crop up in footage from an iPhone, footage that I've captured from Camtasia, footage that I've captured in Wirecast, and pretty much any program that captures in variable frame-rate mode. This problem has also been known to occur with Skype interviews captured with Call Recorder and imported for editing in Premiere Pro.
Enter HandBrake
Now, the easy fix for that is a program called HandBrake. HandBrake is a free cross-platform (Mac and Windows), downloadable tool. Basically, it’s a very elegant front end for the X.264 codec. Figure 1 (below) shows the interface. You bring in your source file by clicking the Source button (shown with its tooltip in Figure 1).

Figure 1. The HandBrake UI. Click the image to see it at full size.
Choosing HandBrake Settings
In the example used in the video that accompanies this article, the file that I've been working with is iPhone.mov, and the file that we're going to create is CFR1 (for “constant frame rate”). After you import the file, there are just a couple of settings that you need to worry about.
Number one, you’re going to use an embedded preset called High Profile (on the right in Figure 1). Choose that to make sure you have a good starting point. We're going to use RF encoding. What RF encoding does is encode at a constant quality and if you drop the RF setting (Figure 2, below) all the way down to zero, you're going to get pretty much lossless quality. Even though you're encoding with X.264 or the H.264 codec, you're not going to see any quality degradation.

Figure 2. Set RF to 0 for lossless quality.
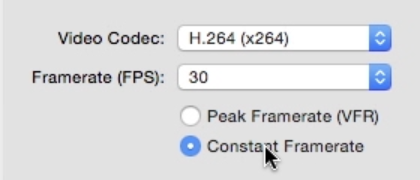
The key configuration option you need to make is Framerate. You want to check the Framerate of your source--with the iPhone it’s 30--and then you want to make sure that you choose Constant Framerate (Figure 3, below).

Figure 3. Make sure your framerate matches the framerate of the source video and—most important of all—choose constant framerate to lock that framerate in and make your video synced and editable in Premiere Pro.
That's the one thing that you absolutely have to do to make this work. Then you can check the audio, and then if you'd like you can boost the audio data rate up to around 320 or so to make sure that you get very little compression on the audio. Then you come back the video and press Start (up top, just to the right of Source in Figure 1). When you press Start, if you have a pretty fast system, HandBrake should take one or two minutes for each minute of video.
Now, if you go back to Adobe Premiere Pro and import the HandBrake video, you should find that the audio sync is perfect.
The bottom line is, any time you bring video into Adobe Premiere Pro from any of these sources that do variable frame rate encoding and experience loss of sync, try the adjustment that we just made in HandBrake. 99% of the time, just changing from variable frame-rate to constant frame-rate should give you perfectly restored A/V sync.
Page 1